My Husband Trevor is a Sales Manager in the cellular industry. One day last summer he got to talking with a customer, named Earl.
Through the conversation my husband found out that Earl and his wife Carol-Ann own a restaurant named CHEACHIE'S.
Well, Trevor and I were invited to drop by the restaurant to check it out.
I had the chance to meet Carol-Ann and Earl (better known as BIG EARL) the following Friday when we took them up on their offer.
As we were talking, they asked what I did for a living. I told them that I created unique pieces of art and that if they wanted to check out examples of my style to just type my name into the KIJIJI Halifax search bar to see all of my ads.
I found out about how the restaurant came to be named Cheachie's.
They had been talking one night about a name for the new restaurant and on a whim decided to call it after one of their cats,....Cheachie.
I thought this was really cute.
A few weeks later Big Earl went to see my husband at work for a cell phone issue and mentioned that he would be interested in meeting with me again to talk about a project he wanted done.
On my husbands next free day we went back to Cheachie's.
Big Earl and Carol-Ann had gone to the kijiji's website and found my ads and wanted me to make them a custom three dimensional sign.
I said that I would start by drawing out some samples for them.
That night I drew for a few hours, trying to incorporate all of the information they had given me about their restaurant.
The facts they gave me:
1) Cheachie is a cat
2) The 2 most famous dishes they serve are a)The BIG EARL burger, b)The Mother Clucker
3) They like vintage style bistro signs
4) Earl wanted it in 3-D
This is the original rough draft,
I am warning you it is ugly.
This was definitely a rough draft, but the idea was born.
The cute kitty Cheachie has now become the chef.
I kept drawing until I found the exact look I was going for.
Here is a photo.
 |
| I spelled the name wrong in this drawing, but you can still get the idea of where I am going with the project |
The next step is when I trace my final draft onto some velum paper and add the text and colour.
With this draft completed, I return to CHEACHIE'S and show the copy to Earl and Carol-Ann. They loved it! So, I told them I would get started on it right away.
When my husband and I left the restaurant we went directly to Home Depot and Michaels to buy the supplies I needed.
1) 2' X 4' plywood board
2) 2 or 3 tubes of No more nails glue
3) painters tape
4) 4 packages of DAS clay
5) paints
6) detailing brushes
I have since given all of the receipts to Earl so I no longer have the exact list of items, some could be missing
After I draw my design onto the plywood, I can begin creating all of the 3-D elements.
As you saw in the very first photo of this post, I used some yellow cardboard to cut out all of the letters I was going to use on the finished sign.
1) I drew them onto the cardboard in the appropriate sizes
2) I cut them out
3) I rolled out my DAS clay to 1/4" thickness
4) Laid the paper templates onto the clay and cut them out
5) I set the letters aside to dry
Now, I use paintable wood filler to fill in the two cat ear shapes on either side of the logo.
Here is a photo.
1) I now take some clay, that I have already rolled out and place it over the pencil lines of my drawing. I roll over the clay with the rolling pin to transfer the pencil lines to the backside of the clay.
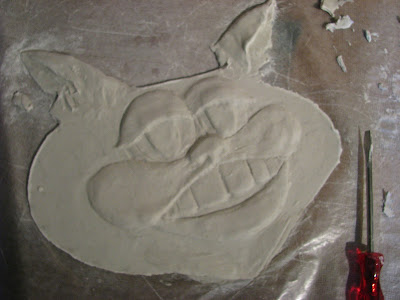
2) Once I have done this, I can cut out the perimeter of the kitty head using the transferred pencil lines.
3) I now have to turn the cat head over and all of the 3-D effects on his face have to be done freehand by looking at my drawings.
Here are a few photos of the cat face.
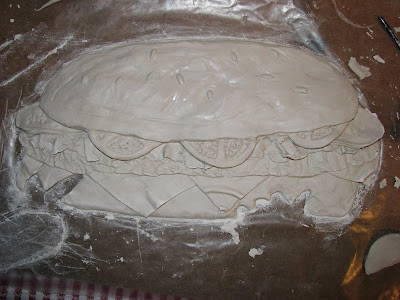
Using the same process as above, I create the chef coat, hat and the BIG EARL BURGER.
Here are the photos.
Now I can place everything together on the board to see how the composition works.
Now, all I have to do is wait for all of the clay to dry.
I leave it for about a week, turning the pieces over periodically so they will dry evenly.
Now it is time to glue everything into place.
NOTE: I am sure you have noticed by now that my pencil lines are not being completely covered by my clay pieces. I had to shimmy everything slightly at the bottom to leave room for a frame which Big Earl will attach after the piece has been completed.
I now create the cat mustache and the 3-D line under the word CHEACHIE'S and allow them to dry.
I prime the entire piece.
Now that all the technical stuff is out of the way I can begin painting.
I start creating a multi-coloured background using a variety of colours.
*red
*navy blue
*purple
*yellow
*light blue
*green
*brown
I blend them all together to create an effect that looks like many layers of paint have been applied over the years, I then dry brush with white paint.
Here is a photo.
You can just see a hint of colour under the white, this is good. When I apply the varathane at the end it will look much deeper.
Now I can start painting in my text.
As you can see I have used red, black and yellow, this is just the first coat so it will appear much brighter later.
NOTE: When you use red paints, for some reason they like to bleed all over the place when you add your varathane. What I suggest you do to prevent this is to use a small brush and simply coat all the red pieces on your painting with 1 or 2 coats of varathane before you coat the rest. This will seal in your reds and they will not bleed at all when you coat the entire piece.
There is NOTHING MORE FRUSTRATING than watching your artwork being ruined right in front of your eyes and not being able to do anything about it.
Now I begin to paint in the rest of the sign.
Here are some photos.
Now For the final photos. I have now added 6 coats of gloss varathane to protect its surface.
I really hope you enjoyed this post.
Bye for now.


