I figured it might be fun to try something different.
It cost a whopping $1.99. I know, pretty steep right?
Stay with me to see my first attempt at Folk Art.
First, I will start by giving you the dimensions of this solid pine piece.
It is 25" LONG X 10" Tall at the highest point.
Pretty small, but with huge impact.
When I first saw this sitting on the shelf I knew that I could make something interesting with it. I didn't know what I would use to decorate it, I just knew that I could do something!
When I got it home the first thing I did was give it a coat of paint, I used blue because I didn't have any primer.
Now, I let the ideas flow. I try to look at the piece for a while to see if it somehow gives a clue as to what it wants to become.
My inspiration came from a familiar source. French and Italian Cafe or restaurant paintings, done in a vintage style.
Here is an example.
The next step of course was to draw. I drew out a variety of ideas for the different shops and restaurants. Some of the original ideas were kept, some were changed.
Take a look.
Now that I had the preliminary ideas, I began transferring my drawings to the pine piece.
I wanted to re-create the look of awnings, window sills, stone facades and signs. My dilemma was, how could I make these items in relief?
Then it hit me.
I could use salt dough.
What is salt dough you ask? Take a look at this How to make salt dough.
Once I had mixed up a batch of salt dough, I brought it back to the table.
I wondered what the easiest way to depict my exact drawings out of the dough would be.
I absolutely HATE to measure, so I said to myself, "Hey self, what if I laid a flattened piece of dough over the pencil lines and then pressed it with a rolling pin, wouldn't that be just like transfer paper"?
Well, I am very pleased to inform you, that YES, it worked out beautifully.
So, the next little while is spent repeating the above process until every piece that I want to create out of the salt dough has been finished.
I have cooked the salt dough, and let it cool for the allotted time.
I now do a dry fit with all of the pieces before I glue them into place.
Once I am satisfied with the general layout, I glue the pieces of salt dough into place using NO MORE NAILS glue.
Now I can begin creating different textures for my building facades.
Now I will show you each of the buildings separately and explain what I used to decorate each one.
WINE SHOP
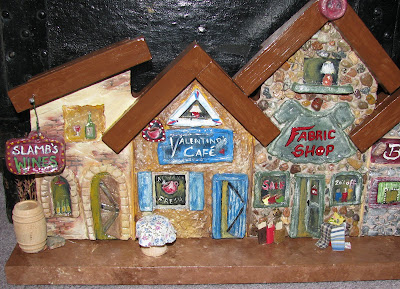
VALENTINO'S CAFE
 |
| I used tile grout to create a rough plaster exterior, painted advertisements in windows, added a wooden spool covered with a tiny piece of fabric to resemble a table. |
FABRIC SHOP
 |
| Added small stones to the facade to make it look like cobblestone. Painted in sale signs in windows, created real looking bolts of fabric with tiny pieces of cardboard and fabric. |
BAKERY
 |
| Added stone to the facade, painted curtains in the windows, created bread loaves out of salt dough for the sign. |
BUTCHER SHOP
 |
| used grout to create a plaster exterior, made small fish and piece of steak out of salt dough. |
WAGON WHEEL RESTAURANT
This entire project was painted with acrylic paints and of course sealed with 3 really good coats of varathane.
Here are the finished product photos.
This is my husband Trevor's favorite piece.
I hope you enjoyed this project as much as I enjoyed sharing it with you.
Happy crafting!
See you next time.


