

No, it isn't a giant, pepto bismol coloured toaster (although you might need some now!)! Although, I do see how you could make that mistake.
It is a really ugly base cabinet.
Today we are going to go on a journey.
Our mission is to use a variety of items and construct a thing of beauty from all the pieces.
I will share with you the complete costs associated with this project at the end of the post.
Go grab a coffee and get comfortable, this is going to be a long read.
Here are the pieces.
An old, hand made toy box base.

Some tiles.

A handmade, birch plywood T.V stand. laying on it's side.

Two antique brass drawer pulls.

At this point you're probably thinking, "Wow, this girl has WAY TOO MUCH TIME ON HER HANDS"!
The truth of the matter is that I am actually a genius! Ha ha!
This just proves that you can't believe everything you read.
Now for the story.
Picture it, a 63 unit apartment building in Halifax,NS., I am asked to temporarily take over the Superintendent position for six weeks while the current Super is recuperating from knee surgery.
One of the duties I was obligated to perform was in/out inspections, I had to make sure that the unit being vacated or rented was in tip top shape.
One of my immediate neighbors was moving and asked me if I wanted some things. Of course I said YES! She gave me fabrics, an old hand made toy box and a plywood T.V. stand.
After she had vacated the apartment, the building repairman and I had to do a final inspection and cleaning. I looked inside the utility closet and found a lower kitchen cabinet.
While we were pulling the thing out into the hallway , I coolly (meanwhile inside I am doing the happy dance) asked if it would be used for the building at any time. The repairman replied, "Nope, you can have it if you want!" YES! Now the first obstacle has been conquered,...I now have my very own huge, pink, outdated cabinet.
I think everyone should have one, don't you?
I was now faced with the dilemma of what to do with it.
I waited until the Superintendent returned, only then did I let the idea bird take flight.
I still had no idea what to do. The bird taking flight, although a romantic notion, must have smashed into a window or something because inspiration failed to strike.
I decided to do what I always do, I took everything apart. This is the way I am able to reconfigure a bunch of random pieces into 1 functioning piece.
The process however is quite messy.
I began by scraping off about a million layers of yucky paint from the T.V. stand (on a side note, if you are looking for a weight loss method that has a 100% success rate, I suggest taking up manual paint scraping. It's wonderful for the abs). That's when I found out it was smooth sided birch plywood. Then I took it all apart. I was left with 4 separate pieces. (I only scraped the largest piece that had the least amount of damage.)

These are the leftovers.

Then I removed about a gazillion finishing nails from the slatted pine, mini prison cell looking toy box. (I unfortunately did not take a photo of them when they were all apart).
I now sand the base cabinet within an inch of it's life and remove the hideous handles.
So to recap, I have a giant pink cabinet that resembles a toaster, a bunch of 12" sticks and a paint free piece of birch plywood. Hmmmmmm! What to do?
Well, here goes.
I laid the plywood on top of the cabinet and proceeded to use all of my 12" pine trim pieces as a border(I used small wood screws to attach them, more stable than a nail).
The plywood is 3/4" thick and the pine trim is 1" thick,...this worked out perfectly. I attached the pine trim around the outer edge of the plywood flush with the bottom so that I ended up with a 1/4" lip all around the top. This was a perfect bed for my tiles.
Now, because the trim I had was only in 12" lengths, I had to piece quite a few together. You were able to see the joints where each piece butted up to the other, I tried concealing this as much as possible by using a generous amount of PAINTABLE wood filler. NOTE: All the screw holes were counter sunk so I was able to fill them with wood filler as well.

When the wood filler has dried, I start sanding and decided at this point to also round off all the corners.
Now it's time to figure out my tile design.
I dry fit my tiles onto the surface until I find a configuration that I like. Then I have to measure.
(As you can see in the photo below the tiles at the outer corners and all along the outer edge need to be cut).

I had NEVER used a tile cutter in my life, let alone own any such thing.
My wonderful husband Trevor bought me a cute little tile cutter and I proceeded to learn how to use it.


EASY PEASY! That was really fun.
O.K. now that I have the hang of it I cut all of my tiles and do another dry fit to see how it all looks.
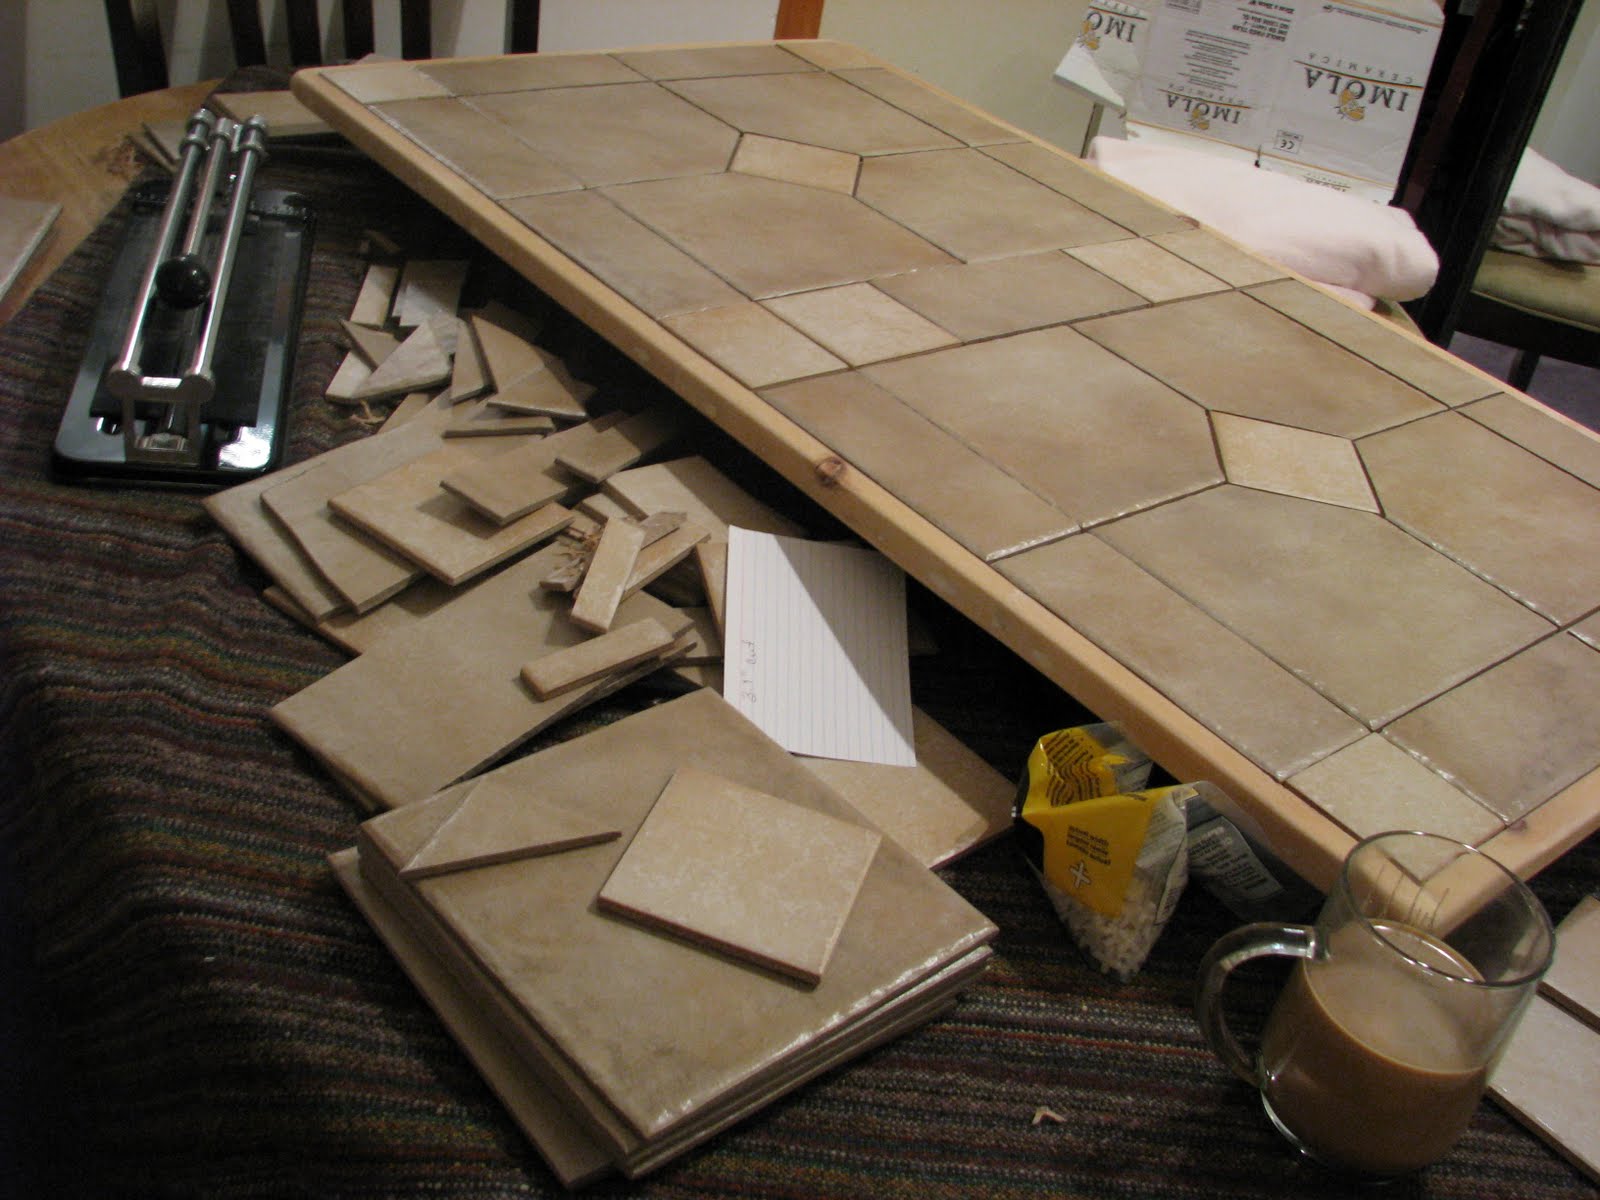
Note: I did warn you that doing this kind of thing creates a big mess, just look at that table. Ha ha!
I am happy with the dry fit, all I have to do now is glue and grout.
I start gluing the tiles down.

All the tiles have now been glued into place. I leave it to dry overnight.

Now we are ready to grout.

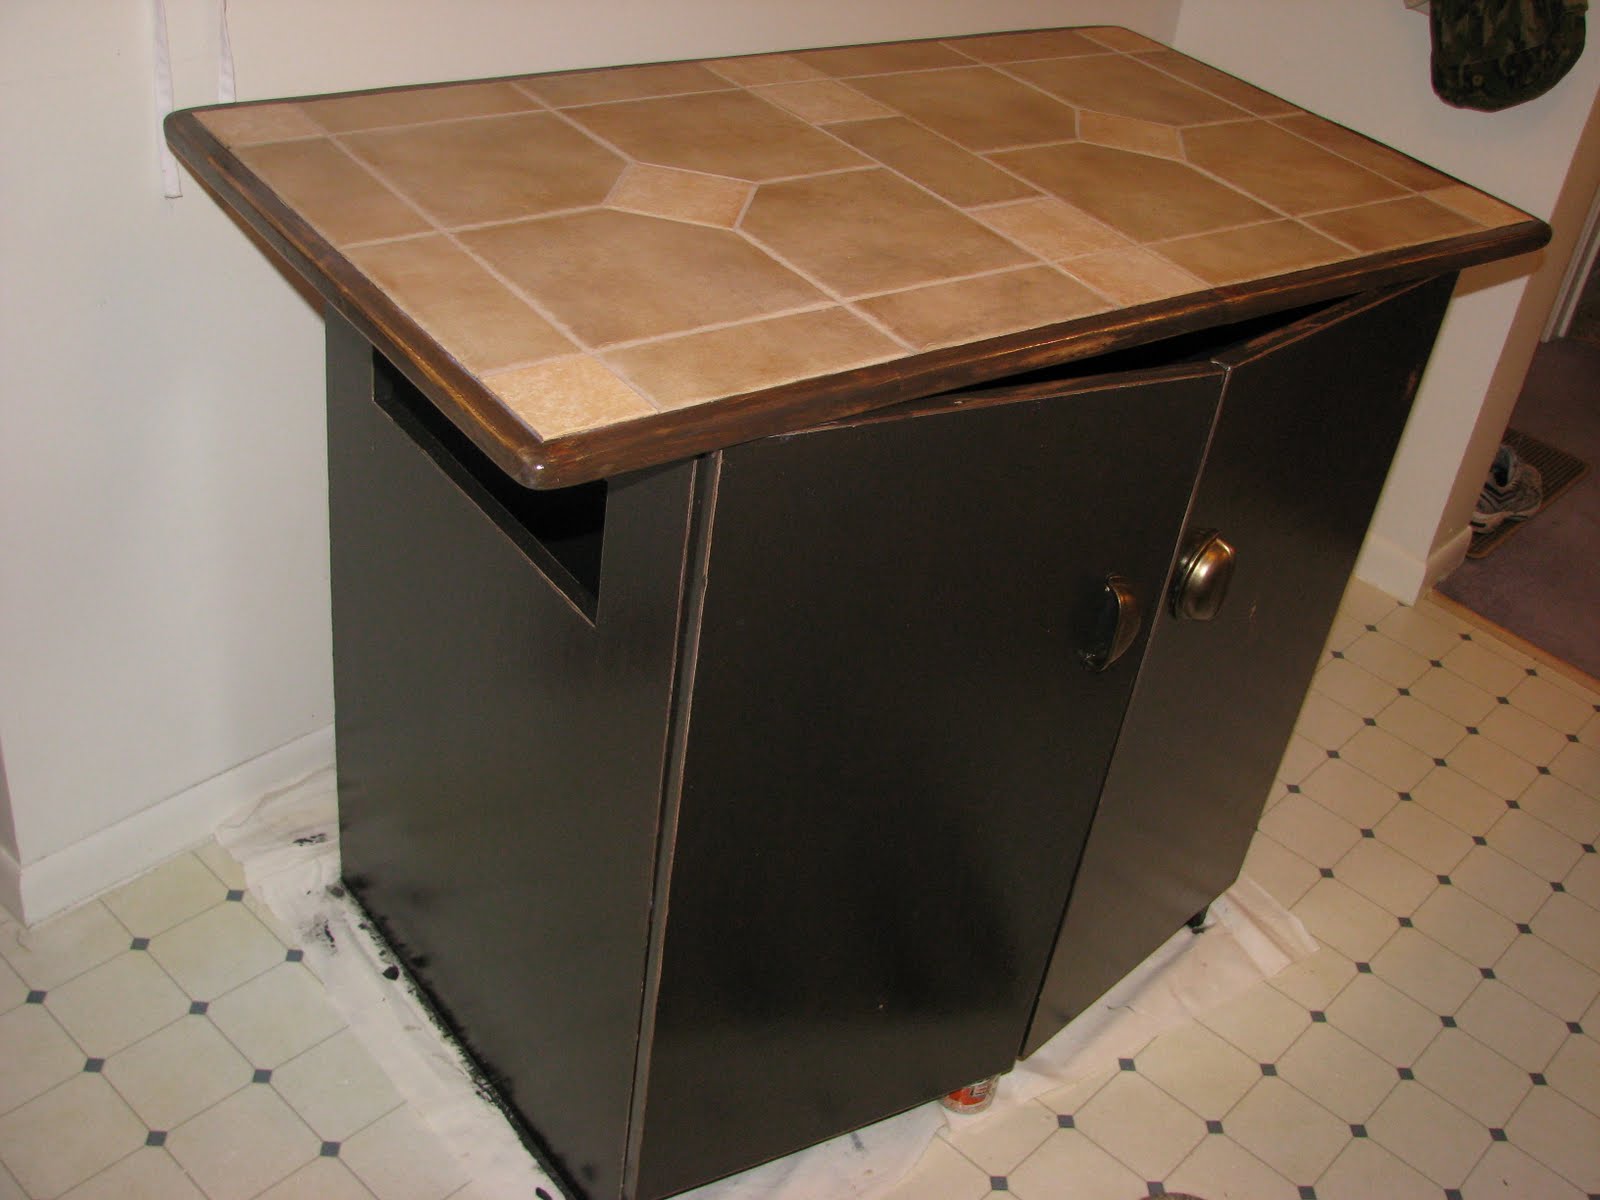
The grouting process is now complete. The tile top has now been permanently affixed to the cabinet from the underside.
Now the decorative treatment can begin.
I start by painting the interior of the cabinet with a gloss chocolate brown. Then, just because I thought it would look nice and be easier to keep clean, I painted the inside bottom and about 3" up the sides in an off-white oil based paint (gloss).

Now I paint the rest of the cabinet.

By now, you would have noticed that lovely rectangular cut out on the side. I actually use the cabinet to conceal my recycle bin, it's quite convenient actually. I just wish there was one on the opposite side for the garbage can.
Oh well, you can't have everything!
Now I create a stain out of my chocolate brown paint, a little bit of black paint and some water. Using a small paint brush, I apply this stain to the pine border. I rub it off and then repeat.
Now I take the time to distress the entire piece to make it look antique.

Finally, I install the new hardware. These are antique brass drawer pulls that I have placed vertically rather than horizontally.

Apply 2 coats of varathane to exterior.
Now the island is complete, but we still have the hutch to transform.
HUTCH

This is what it looked like when I found it.
Pretty sad, but it's SOLID MAPLE.
I wanted an open style country hutch, so the first step was to get rid of the doors.

AH, much better!
I still don't LOVE it at this point though. I find that the central piece of wood is detracting from my vision. So, you guessed right, I simply cut it off.
That was not as simple as I might have implied! I don't have a power saw, and I wanted to create as little damage as possible so I used a very thin saw blade pressed firmly against the edge and it took me two whole days to make it through!
No, just kidding. It did take a couple of hours but the image of the finished project in my mind kept me focused.

Now that the cutting part is over, I can sand it. I take it outside and sand the entire perimeter and the shelf edges to prepare for painting. I will be leaving the whole inside of the hutch the original wood colour.

The next step is to apply the same chocolate brown paint as the island to the outside.

Now I distress it to match the island, and add some country style wood plugs to the holes left by the old doors.

The final step is to coat it with 2 coats of varathane and set it on top of the island.
Here is the finished
Country Style Kitchen Island & Hutch


Now for the cost layout I promised at the beginning of the post.
ISLAND
Tiles: $3.00 bought the small square ones from the Re-Store, the larger tiles were FREE!
Tile glue: $0, already had some
Grout: $0, given to me
Drawer Pulls: $2 from Re-Store
Paint: $2.00 from Re-Store
Varathane: $0, already had some
Pine trim toy box: $0
Old plywood T.V. stand: $0
Old base cabinet: $0
TOTAL $7.00
HUTCH
Hutch: $15 from kijiji
Paint: $0 Already accounted for above
Country style wood plugs: $0, already had
Varathane: $0, already had
TOTAL $15
So, for a grand total of $22.00 I have a custom made Island & Hutch.
The moral of this story is, just because you're cheap and ugly doesn't mean anything.
Hope you enjoyed the journey.
Have a great day.