

He was elected VP of Services at the beginning of the school year.
The VP of Services' three main focus areas are the Student Food Bank, Tutoring and Fund Raising.
I came up with a plan to help raise funds before the holiday...I created a series of hand drawn cards celebrating the winter season.
I was all excited, the cards turned out great!
(The drawing of mug, cookies and chocolates above is an example of one of said cards.)
My Mom and Mom-in-law both LOVED all of the images I created...the problem came when I investigated the price of printing :(!!!!!!
It was a great idea, however, the cost of printing was just way too much considering this was supposed to "raise" funds.
I had to try and come up with another plan...
The reason I wanted to create something extra special is because this is my husbands final event...he has decided to focus solely on his studies in the new year, therefore is stepping down from VP of Services position.
I decided to sew a GIANT gingerbread man.
His dimensions are
31" Tall
X
32" Wide
X
1 1/2" Thick
Here are the materials I used:
- Large piece of cardboard for my pattern
[I collect as many as I can from my local COSTCO. They are huge sheets
that are placed between the paper towel stacks...the best part is that
they are FREE!!! NOTE: just remember to bring some rubber bands so you can roll them up to put in your car :)]
- Carpet underlay [enough to trace your pattern 4 times]
- Muslin for base [any white cotton fabric would work]
- Thread and needle of course
- Decorative fabric [I used upholstery grade ginger faux suede for body, flannel patterned and solid for clothes, and felt for piping]
- Trim [felt, white rick-rack and faux fur]
- Buttons [this was the first time I ever covered my own buttons...you just buy a button kit and follow the directions on the back...so quick and so FUN]
- Glue gun
Here are the images of the project creation;
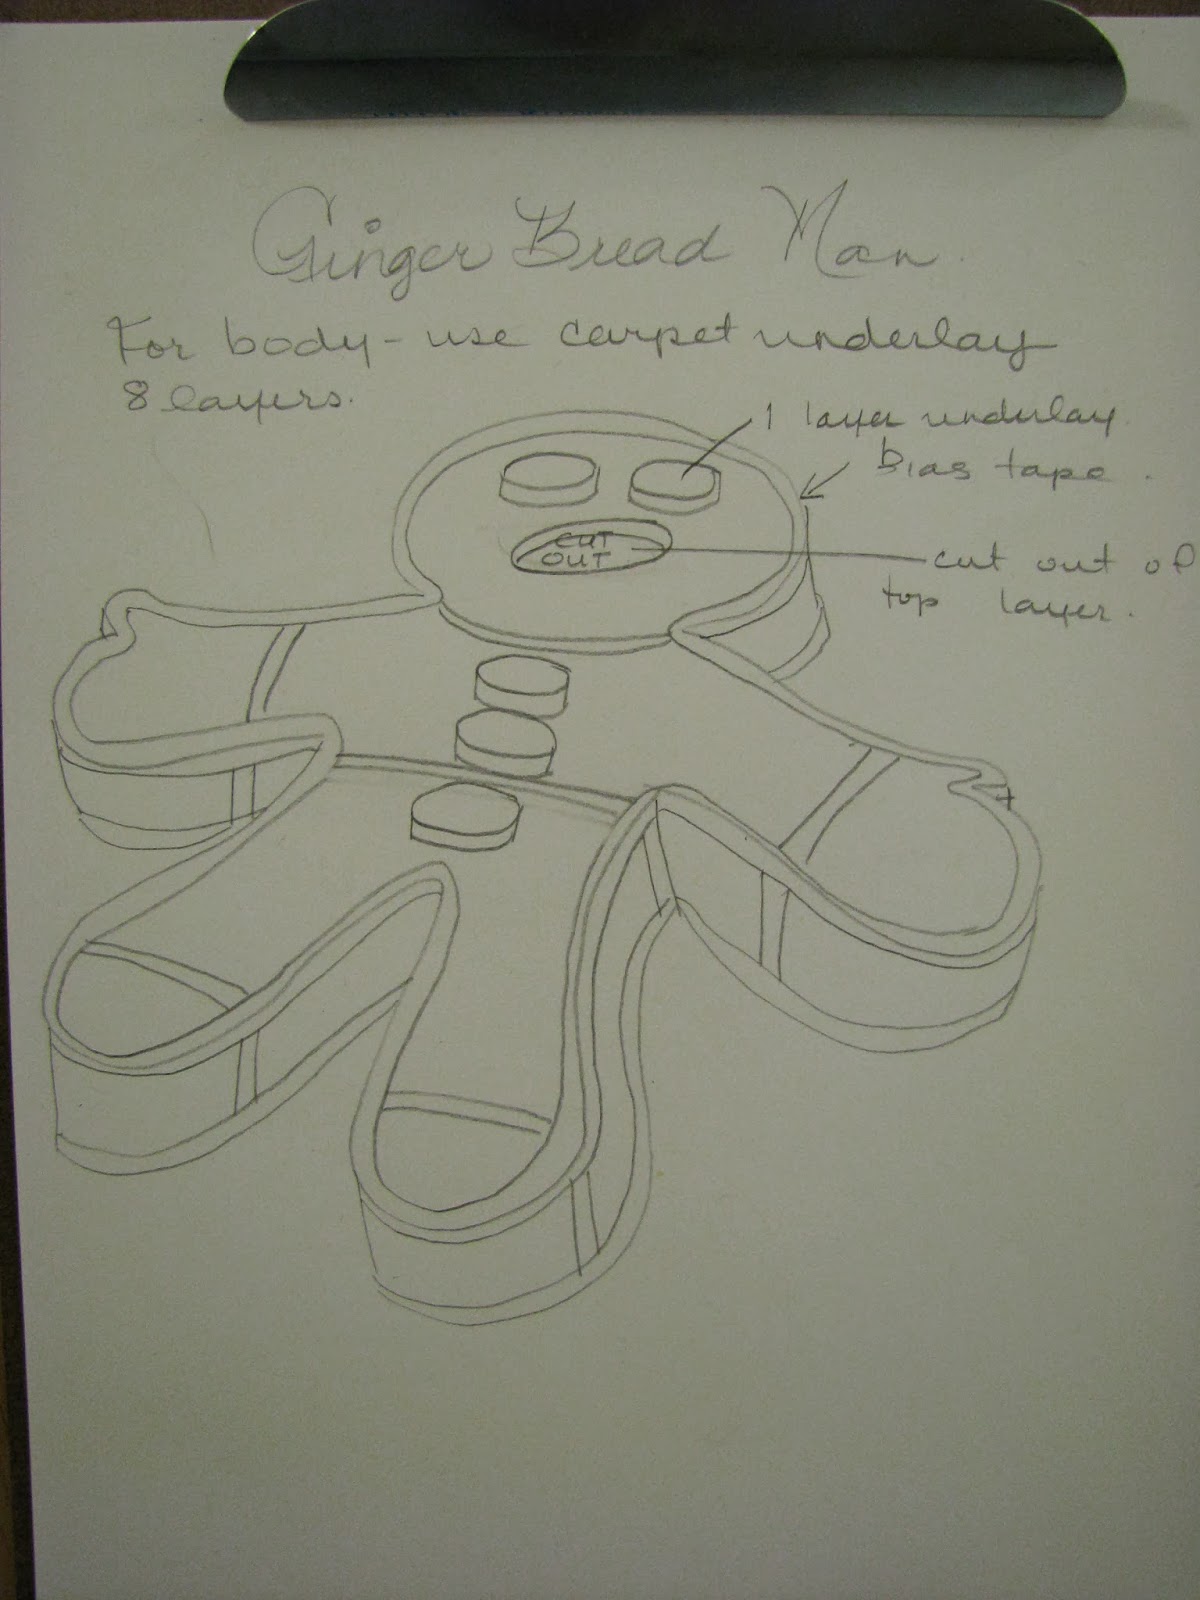
I used 4 layers rather than the 8 depicted in preliminary drawing.

Here is the cardboard cutout.

I have traced my pattern to underlay

I have folded my muslin fabric in half and traced my pattern...when it's cut, I will have my front and back pieces.

My base fabric is cut...notice I left a half inch of excess all around.


No, the arrow isn't pointing to the face so I won't forget where it is...Ha ha haaaaa
I just put the arrow on to signify that this is the piece I want for the top layer.

On the top layer of underlay, I decided I wanted to cut out a mouth so it had a bit of dimension.

Here I have cut my muslin base fabric around the mouth.
When you make small snips
in the fabric like this, it is easier to sew around curved edges.

This image shows the base fabric has been sewn in place around the mouth.

This is the reverse side of the mouth...depicting how the edges have been stitched in place.

Now I have placed base fabric along entire gingerbread man perimeter and proceeded to pin the top, bottom and edge base fabric together in preparation for sewing.


The perimeter is finished.

Now I can place my faux suede pieces.
I would have covered the entire body with the suede, but I just managed to cut the essential pieces with the amount I had left over from another project.

Below, I am beginning the EXTREMELY DIFFICULT part of sewing the faux suede in place...this is upholstery grade fabric, VERY THICK and hard to sew by hand.


Before I sew the face onto base fabric, I had to alter it to include a mouth and eyes of course.
I have to cut an opening for the mouth, and then sew the eyes into place.

Above, you can see the eyes are also made with an underlay base.

The white fabric you see here is a stiff felt that I will use for the eye shine spots...as well as the brown felt for the actual eyes.

Here you see one eye completed with a simple blanket stitch around the edge.

Here I have the eyes temporarily in place to see how they look.
YUM...they look chocolaty :)

Above, I have pinned white trim around the mouth to mimic icing.


Below, you can see the icing has been stitched in place. I used a very fine blanket stitch along both edges.

Now for the eyes.

I am sewing the perimeter of the eyes to the faux suede.

Here is a view from the back of the fabric.

Here the eyes and mouth are complete...now all I have to do is sew the perimeter of the face fabric.

Now, I also have to incorporate the faux suede onto the cookie edge.


Here all edge fabric has been sewn in place.


The fabric I chose for the clothes has mini gingerbread girl and boy cookies all over. Ha ha.

Once I had the fabric in place, I sewed one edge of the fur trim to the decorative fabric...the other edge I glued in place.
Notice that I also cut a small piece of white felt for the pajama opening at the neck and placed a button at the top.

Here you can see the little bum flap that I created out of red flannel with white felt trim and two more hand covered buttons.

A close up view...

A close up view of the decorative fabric...


Below, I added red flannel trim that I made and glued and topped with white rick-rack.

Here you can see what the whole back looks like.

Now, I am making the trim for the outer perimeter of the gingerbread man. I am using felt and sewing it into
really long strips similar to wide bias tape.

This is how it looks close up.

Here is the side we will see when attached.

Here is the felt trim pinned in place.


Here is a better look at some of the trim details.

The bum flap is a functioning pocket.


Here it is from the back COMPLETE.

Here it is from the front COMPLETE.

I even created 100 raffle tickets to raise funds for the Student Food Bank, as seen below.
Notice that the gingerbread man I used on the ticket is the same one I drew on the seasonal card at the top...Photoshop is AWESOME!!!!

Now, after all that work,we found out that a raffle is like a lottery and that the school needed special approval.
We did get approval, but it came with only two days left of school before the holiday...leaving us with no time to promote the event at all.
I was cutting it pretty close anyway because of my season card SNAFU, but it would have been ultra special for my husband to be able to step down from the VP of Services position after raising a nice amount of funds for the Student Food Bank.
I even considered donating it to someone else for a raffle of some sort...but at that late stage they would have had the same issues as we did...not enough time to promote the event.
Oh well, live and learn!
I hope you enjoyed this post as much as I enjoyed sharing it with you.
Until next time, Be Creative!!!
:)