

I do.
Actually, I have two...Magoo and Gregory.
Magoo is an older cat, calm and peaceful. Unless of course he's hungry or Gregory is tackling him...in which case you'll either hear a maniacal meow that could melt your ears or a fit of intense hissing.
Gregory, on the other hand, is only a year old and VERY active.
Don't let this cute picture fool you...Gregory is a terror!
Albeit a very cute one :)
He loves to play with anything...and EVERYTHING!!!
A list of his favorite toys are as follows;
* dust bunnies
* yarn
* thread...especially when attached to a needle, while it is in my hand! OUCH!!!!!!
* electrical cords
* pulling coats off their hangers
* flashlight beam
...I think you get the picture!!!!!
One of Gregory's all time favorite things to play with are SHOES.
In this post, I will show you from conception to completion, the giant sneaker I made for his enjoyment.
I hope it makes you smile!
First I sketched a shoe...

In this design, I created a hole in the side of the shoe...however, I chose against this in the end.
My shoe looks slightly different from the drawing as you will see.
First things first...I need to gather my materials.
Here is a list of the materials I used;
- Carpet underlay
- large pieces of flexible cardboard (free...from COSTCO)
- Blue pinstripe bed sheet for the outer fabric on the shoe
- Funky coloured fabric and buttons (from a set of children's curtains...bought off of kijiji) for inner fabric
- The top folded edge of a white, queen sized bed sheet for the giant shoe lace
- plastic canvas for lace aglets (the plastic pieces at the top of shoe laces)
- white yarn
- thread
- blue checked fabric for inner grommet / eyelet ring
- blue checked fabric (different print) for top and bottom circular shapes of grommet / eyelet
- felt pieces...hard type, but still flexible enough to manipulate. Used for grommets...checked fabric is attached to it
Now, I have to draw my pattern pieces onto the cardboard and then cut them out.
Here they are.

In retrospect, I should have had both the shoe sides in one full piece...
see below.

However, that is NOT what I did! It was a bit of extra work, but it still worked out :)
Next I have to get my roll of carpet underlay...which I will use as batting.

Doesn't look like much does it?
Well, hold onto your socks people...
here are some of the pieces of underlay cut up.

Notice, the sole has 4 layers

Each of the sides have 2 layers

Here you can see all of the pieces...I forgot to snap pics of all the pieces before
I started to cover them.
Here they are in various stages of completeness.

The rectangular piece at the top left was going to be a pull tab at the top of the back of the shoe...
I decided to omit this piece in the end.
Now, every shoe has eyelets / grommets...our shoe will be no different.
I have to make sure to alter the pattern pieces to fit the grommets, first.

Then I have to cut corresponding holes in the underlay pieces.

When I have sewn the fabric perimeter
(leaving the bottom edge open of course),
I turn it right side out and slip over the cardboard that has been sandwiched
between the two layers of underlay.
Here is the process.


YES, it is ALL hand stitched.

After you finish sewing the perimeter, make sure to make snips with your
scissors along any curved edge...this is to ensure that your fabric lay properly
when you turn it right side out.
It will pucker and bunch up if you omit this step.


Once everything is in place, I pinned the bottom opening to prevent any shifting.

With your fingers, find the openings of the grommet holes beneath the fabric...
make small X shaped cuts with your scissors in the center of each hole.

You have to repeat the process on the reverse side as well.

Now, we're almost ready to install our grommets.
What are grommets you may ask...here are three images of grommets / eyelets
This is what a grommet looks like in the package...every grommet comes in 2 pieces.

Below, is a grommet kit...it comes with a grommet set tool as you can see.
Follow the instructions on the package...you can't really go wrong.

This is how they look when installed on a real sneaker...nice and neat.

Now, I have to make grommets.
This picture shows thin white pieces of firm felt cut into strips.
These will be for the inner ring of my grommets.

Finished inner ring.

Below, I have checked blue fabric cutouts and some circles cut from a firm sheet of felt ...
these will become the top and bottoms of my grommets.
The next few images show this process.


This is a finished grommet.

Side angle, to show thickness.

Here they are installed...since the firm felt is still malleable, I could squish the grommets
and push them into the holes in my fabric and underlay.
I then had to arrange them just right and sew the edges into place.


These are really cool.


As you can see from the images above, I have already started to
sew my fabrics onto each individual piece of underlay.
Here are some of the other pieces individually.
The shoe sole

The tongue, front and back


see below.
However, that is NOT what I did! It was a bit of extra work, but it still worked out :)
Next I have to get my roll of carpet underlay...which I will use as batting.
Doesn't look like much does it?
Well, hold onto your socks people...
here are some of the pieces of underlay cut up.
Notice, the sole has 4 layers
Each of the sides have 2 layers
Here you can see all of the pieces...I forgot to snap pics of all the pieces before
I started to cover them.
Here they are in various stages of completeness.
The rectangular piece at the top left was going to be a pull tab at the top of the back of the shoe...
I decided to omit this piece in the end.
Now, every shoe has eyelets / grommets...our shoe will be no different.
Then I have to cut corresponding holes in the underlay pieces.
When I have sewn the fabric perimeter
(leaving the bottom edge open of course),
I turn it right side out and slip over the cardboard that has been sandwiched
between the two layers of underlay.
Here is the process.
YES, it is ALL hand stitched.
After you finish sewing the perimeter, make sure to make snips with your
scissors along any curved edge...this is to ensure that your fabric lay properly
when you turn it right side out.
It will pucker and bunch up if you omit this step.
Once everything is in place, I pinned the bottom opening to prevent any shifting.
With your fingers, find the openings of the grommet holes beneath the fabric...
make small X shaped cuts with your scissors in the center of each hole.
You have to repeat the process on the reverse side as well.
Now, we're almost ready to install our grommets.
What are grommets you may ask...here are three images of grommets / eyelets
This is what a grommet looks like in the package...every grommet comes in 2 pieces.
Below, is a grommet kit...it comes with a grommet set tool as you can see.
Follow the instructions on the package...you can't really go wrong.
This is how they look when installed on a real sneaker...nice and neat.
Now, I have to make grommets.
This picture shows thin white pieces of firm felt cut into strips.
These will be for the inner ring of my grommets.
Finished inner ring.
Below, I have checked blue fabric cutouts and some circles cut from a firm sheet of felt ...
these will become the top and bottoms of my grommets.
The next few images show this process.
This is a finished grommet.
Side angle, to show thickness.
Here they are installed...since the firm felt is still malleable, I could squish the grommets
and push them into the holes in my fabric and underlay.
I then had to arrange them just right and sew the edges into place.
These are really cool.
As you can see from the images above, I have already started to
sew my fabrics onto each individual piece of underlay.
Here are some of the other pieces individually.
The shoe sole
The tongue, front and back
Here, I have added regular white felt to the edge to make it look
nice and finished.


Here is the shoe toe...also with felt trim.

Here is what it will look like when attached to the tongue.

A close-up of the felt edge pinned

A close-up of edge being sewn.

Here is the heel.

I didn't take a picture of the creation of the actual laces, but it's basically a REALLY long piece of
white fabric, doubled and sewn.
I do, however, have a picture of the plastic canvas...finished aglet and shoe lace all together.
Here it is...

Here I am sewing the side pieces together at the back seam.
First I use yarn to stitch both pieces together...I am using a blanket stitch here.
Then, as you can see, I am covering the unsightly yarn stitches with more
of the blue checked fabric.


Now for the construction...
Gregory LOVES to help!!!!!

I don't have to move do I?

I've decided...I'm NOT moving, and you can't make me!

Okay, I'll get out...but only so I can inspect your progress.

Pinning, pinning and more pinning.

Playing...

Playing and some more playing ...

I am SOOOO HAPPY!!!!!!
Pinning the sneaker sides to the sole in preparation for stitching.

As you can see, I attached the heel piece earlier...forgot to take a picture
of the process.


Attaching the tongue and toe


Pinned in place

Now stitched into place.


I created this small pillow to stuff into the tip of the toe
for added support to help keep the rounded shape.


Here, I insert it into place.


The pillow worked out well.

Now, I install the giant shoe lace.


Lot's of space inside :)
Gregory is going to like this.


Just in case you wondered how big this sneaker actually is...
Here it is next to my sneaker.


Oh, here's Gregory...time to investigate.

That didn't take long :)


All MINE...don't come any closer!!!

Oh look, a button...NICE!!!

So snug!!

Stop looking at me!

What are these round things?

Just give me a hug!!

I still don't know what these things are!
Curious...I bet I could put my paw through there...
Whatever they are, I LOVE them.


WHAT?

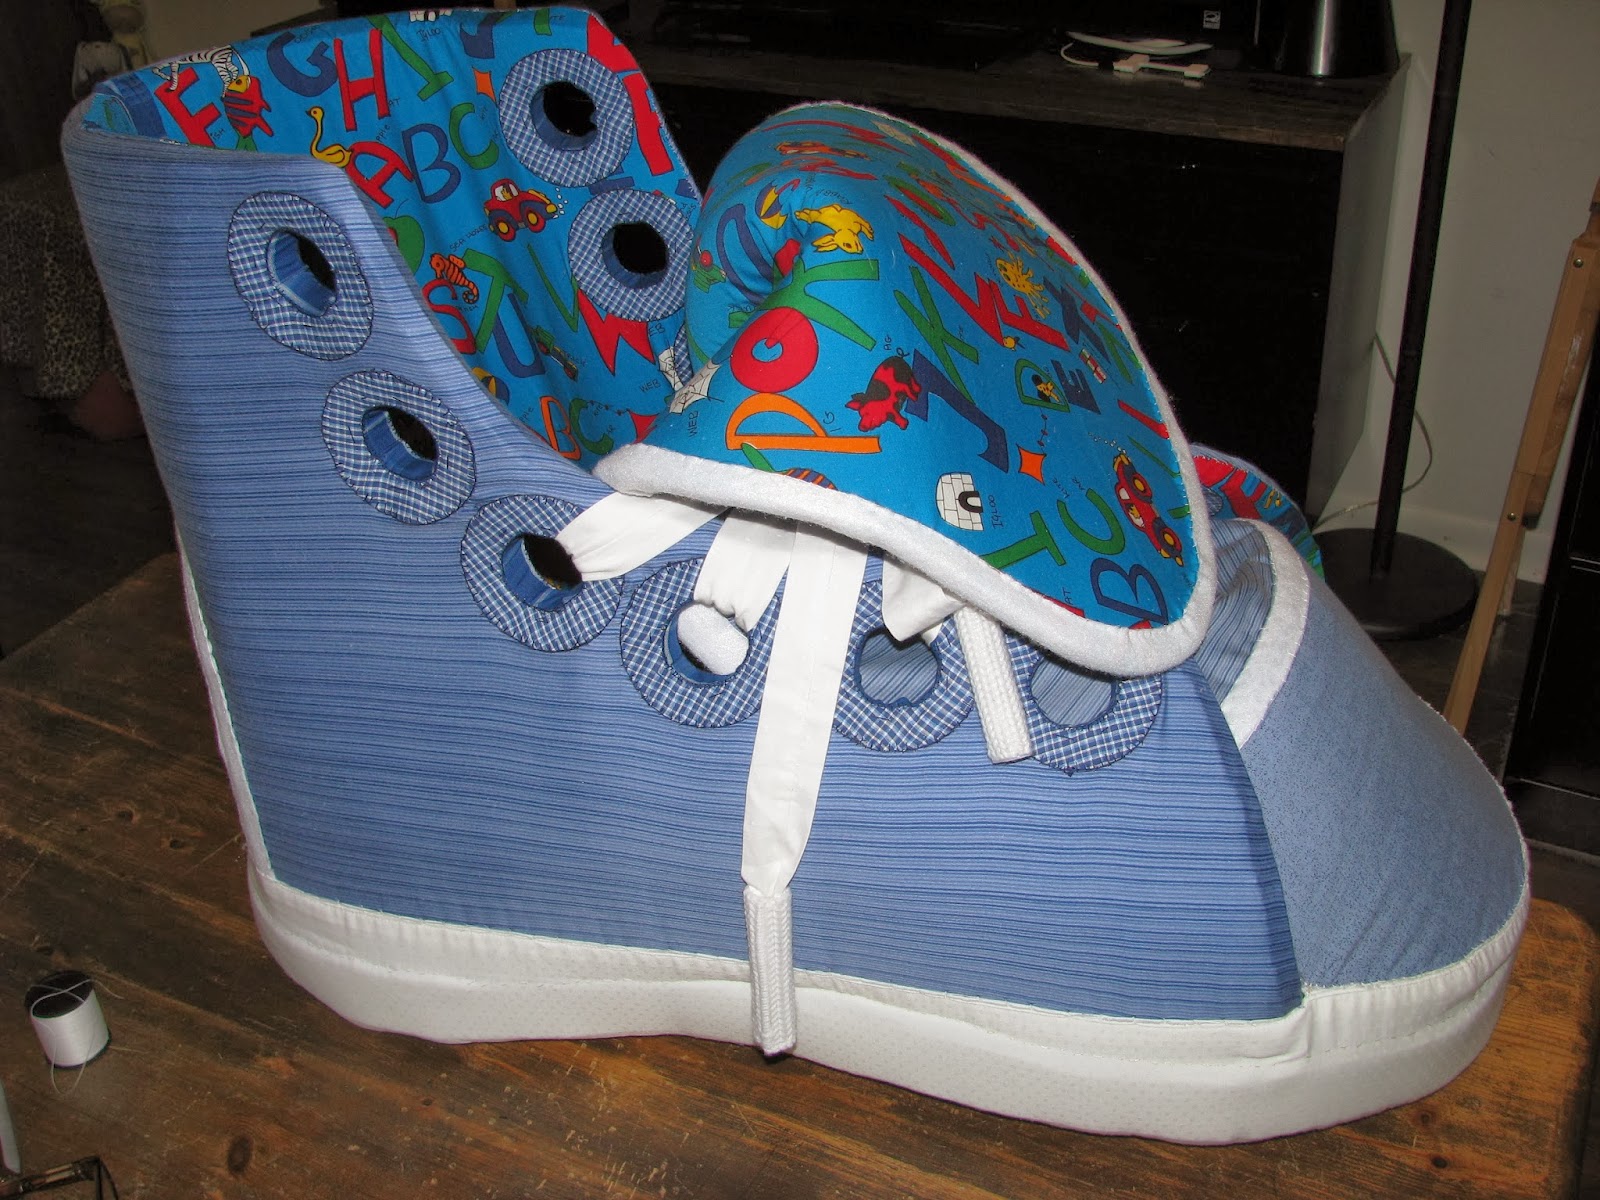
Here it is from the side so that you can see that the shoe sole is
complete as well.


Hmmm, I like it this way too!


I can see you...and look...I CAN stick my paws in these, FANTASTIC!

I can STILL see you...

Okay, now you're annoying me!!!
This is MINE, now go away!

Here it is complete.

It has taken a long time, but only because I kept getting side tracked with other ideas.
Until next time, Be Creative :)