

I created this poster specifically for this next post...and YES, that is the
cartoon version of me.
Ha ha ha!!!!
Many of you have been wondering why I haven't posted anything lately...this is why!
I have been sewing my little fingers to the bone.
I do have a sewing machine, but it needs to be serviced...but I didn't let that stop me!
The previous post, Rustic French Shutters, shows you the hand stitched curtains
that were my inspiration for the duvet and pillow shams.

I just needed to have a fancy new set of linens to match!!!
Now, I don't know about you, but I like when a comforter hangs down at least half way to the floor on the side of the bed...In order to do this, I suggest that rather than putting your comforter on the bed from top to bottom, lay it sideways.
It makes a HUGE difference!
The reason I mention this at all, is because it's exactly what I did so my duvet cover
would be much fuller.
The material I used to create all of these pieces are as follows:
* 1 flat, 1 fitted pale blue/white pinstripe sheet
* 1 queen size striped sheet (used for backing...reversed it to the muted side so it matched better)
* 1 single cotton curtain of French Toile de Jouy, which is a pictorial fabric depicting people, animals, land and architecture
* a huge piece of muslin 10 feet x 20 feet (was actually a photographers backdrop)
* 3 full spools of mercerized cotton thread (175 yards/spool)
* any colour of thread for basting
* 14 dress shirt buttons which I used for embellishing the Toile ties.
The first thing I needed to do was measure the comforter I wanted to cover. Now I have a VERY SMALL apartment, so I was unable to properly lay the comforter on the floor...so I had to make all of my measurements in halves.
I folded my comforter in half (making sure it was in the proper direction as I stated above), and layed it on the floor. I did the same with the large striped sheet that I would be using for the backing.
Using the comforter as a measuring tool, I cut the backing fabric to size...ALWAYS leave excess on all sides. I left at least 3" of excess fabric.
I stared at all my fabrics for a LONG time, trying to picture in my mind exactly how to incorporate them all to achieve the look I was going for.
I had to make the best use of the Toile de Jouy because I did not have a whole lot of it.
Here is one of my drawings of the design I decided on.

Once this decision was made, I had to prepare all of my pieces to sew.
Here is an image of the actual fabrics laying in the order in which they will be sewn...I just wanted to see the composition.
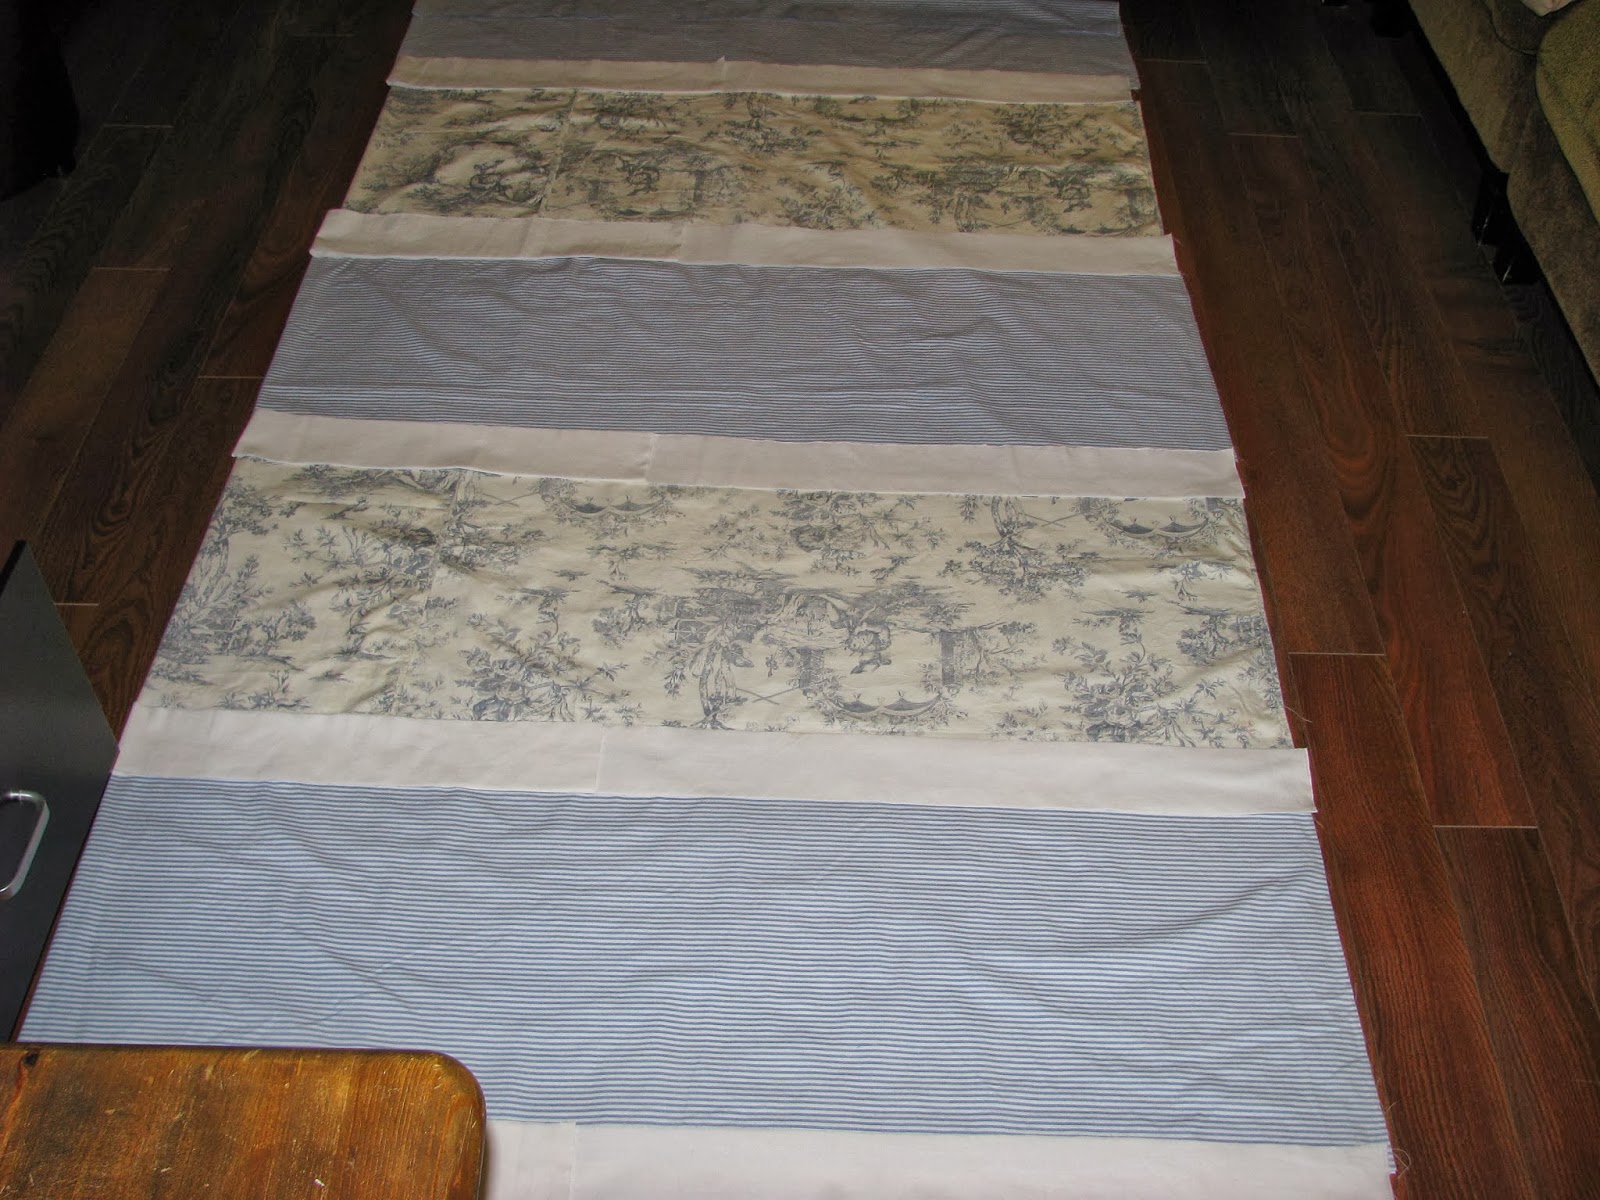
Again, this is all folded in half...but you get the picture.
Here is a drawing view of the inside top with Toile ties.


Here it is with each stripe sewn together.
Below is a close up of the stitched and pressed seams at the back...

it makes everything look pristine and professional.
Here I will show you the thin strap tie construction.

The image below shows the Toile has been folded in half...pressed, then each edge folded in toward press line and then pressed again...exactly like bias tape, except the fabric is cut straight rather than on the bias.
Once you have your thin straps all pressed, you must stitch it closed.
I used a blanket stitch.
Here are the straps complete.
I made 14 in total.
I have to say, that was a tedious job! The ties do look great though!!!
I backed the front layer of the duvet cover with muslin to protect all the stitching.
Here it is basted together with green thread.


Here is a drawing of the construction of the top with ties.

The piece of edging labeled #3 above, has to be sewn in place differently from top to bottom...
On the top I did a straight stitch, and on the underside I did a very fine blanket stitch.
My former boss Marilyn gave me that piece of advice...she said, "You can't stitch both layers at the same time, because you can't see if the bottom stitch is straight. Sew the top first and then sew the underside."
Here is a drawing of what I mean.

Here is an image of what the finished product would look like before it's attached to
the rest of the duvet cover

Here it is attached.

Here is a partial view of the backing striped fabric.

Here is a drawing of the layer construction of the duvet cover.

Here it is complete.
You can see that the comforter is inside...


Now for the pillow shams...
Here is a drawing of the original concept.

Here is an image journey of the actual construction.


Boy, am I glad this project is done!!!!
I hope you like this as much as I do.
I finally have my beautiful French inspired bedroom...
all I need now is to paint my walls!
Ha ha ha...well, I'll leave that for another day.
Until next time, be creative!
UPDATE!!!
I removed the ties and added a zipper closure to the duvet cover.
As you can see below, part of the ties remain, and leaving the cute button detail.
I folded the tie toward the back side of the duvet and sewed it in place cutting off the excess,.
It looks so much cleaner doesn't it?

I pinned my zipper in place and stitched it in.
Because my duvet cover is basically the same size as a queen size comforter that lays sideways
on a bed...it is approximately 90" wide. I was going to purchase a zipper by the meter / yard because I didn't think I would be able to find anything in the size I needed.
Well, I was wrong!
I went to FABRICVILLE and unbeknownst to me, they had an upholstery section.
I was able to purchase an upholstery size zipper measuring 72" for $4 which was perfect, compared to an actual duvet zipper which was only 62" for approximately the same cost!

I like the closure so much better now :)