I spent a lot of time on the beach as a child and will always associate it with a sense of pure freedom.
I can easily imagine myself walking on that shore as the wind blows in my hair and the sea sprays my face with a gentle mist. The motion of the water as soothing as a warm embrace. The rocks glitter like jewels in the sun, making me think of long lost treasure waiting to be rediscovered.
I smile up at the sun with peace in my heart, knowing that the Lord gave me this as a gift.
My feelings of freedom and wonder inspired me to express my gratitude with paint.
I hope this angelfish makes you feel wonder, and that the majestic beauty of the oceans inspires you too.
This is a photograph of a Semi-Circle Koran Angelfish.
I really liked the markings on it and was inspired to create my own version. Note that my version does not look exactly like this, I like to add my own personal style to all of my paintings.
In this post I will show you project progression photos allowing you to get a better idea of the process.
Here are three rough IDEA sketches of the angelfish painting. The finished product looks slightly different, but I think it's very important to put a sample together to give an idea of the basic layout.
After completing my sketches, I really liked the idea of having the angelfish be the absolute focal point of the painting. I needed a board that would be big enough to accommodate a HUGE fish.
I settled on a 1/4" thick piece of plywood that measures 2 Feet X 4 Feet. Here it is before I started.
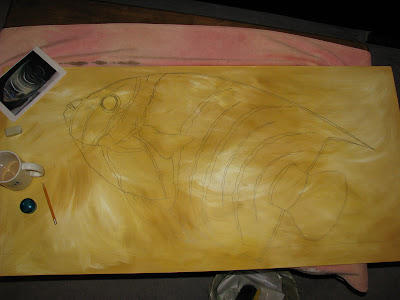
I primed the board, then painted with a yellow wash so that the pencil lines of my drawing would be visible on camera.
Below I have drawn in the angelfish.
Then I begin to paint in all of the rocks, water and brain coral. I have painted the inner fish body black at this point.
Now I begin painting the fish body in. This series of photos will show the steps I took.
Now, I begin to add the markings on the angelfish body.
Now I begin to paint the water in a much brighter shade of blue.
If you look to the bottom of the painting, you will see a drop shadow under the tail.
Now, using an old stiff bristled paintbrush you can create the look of plankton floating in the water.
Dab brush into paint, (removing excess), run your fingernail across the bristles and a fine splatter will appear on you work.
NOTE: Please try this on a scrap board first so that you get the desired effect.
Now I apply 6 coats of acrylic varathane (gloss).
NOTE: Varathane goes on milky, but dries clear.
Here it is when gloss coating has dried, VERY SHINY!
Here it is completed.
I hope you enjoyed this project as much as I enjoyed sharing it with you.
Bye for now.


