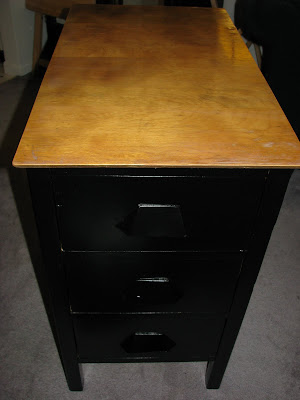
As you can see, this desk is in pretty rough shape. The veneer is peeling on the far left and the middle drawer has been mangled at the edges.
If you want to see what I created, just read on.
When I saw this desk, my creative juices began to flow.
I had absolutely no intention of using it for it's original purpose....not for long anyway! (As you can see in the photo above, I did use it as a desk for a while)
The question of what to create was answered, I decided to make two very rustic looking end tables.
NOTE: LOOK TO PHOTO BELOW
Some desks have only three legs per pedestal, using the backer board for stability rather than the four legs per pedestal that you need for this project.
Here are the steps I took.
1. Remove the desk top (remove carefully, you will reuse this later)
2. Remove the thin back board (remove carefully, you will reuse this later)
3. Remove center drawer
4. Remove all wood pieces connecting the two banks of drawers together
ie: center drawer and bottom braces
HERE IS WHAT I AM LEFT WITH AT THIS POINT
5. I also removed the outer trim on the desk top edge
6. Using a circular saw, my husband cut 2 pieces of the old desk top (obviously,we avoided using the damaged bits)to use as new end table tops.
7. He also cut two pieces for the backs of each of the pedestals out of the old backer board.
8. Once all the pieces were cut, I began to assemble.
a) The first thing you need to do is attach the backer board, it would be difficult to attach when the top is on. (I just used small finishing nails)
Notice if you will in the photo above that one side of the back has a groove that the backer board slides into and the other side is attached with finishing nails. When the desk was together, the backer board fit into grooves at either end.
b) Next you attach the table tops. I laid the table tops on the floor upside down and put the pedestals on top and screwed them into place. (I used stainless wood screws for this step)
c) Once you have everything attached, you need to sand everything. (I rounded off all of the sharp edges).
d) Using tremclad oil based paint (GLOSS BLACK), I painted both pedestal bases
e) Finally, I applied a few coats of varathane to table tops. I happen to like the old marked up look of the desk, so I just applied the varathane over the character.
And,....drum-role please
Here is the finished project.
 |
| The varathane hadn't been added to the tops at this stage. |
I hope this post gave you some inspiration.
Bye for now.


